 "DenverHS_IYH")


Jam at Home: Keeping Summer Fruit All Year Round
With the rise in home gardening this year many new green thumbs are coming into a real bounty of fresh, homegrown produce. From watermelon vines taking over your backyard to buckets of cherry tomatoes, you may find you have a surplus of summer splendor. Not sure to do with this newfound bounty? We’ve got you covered.
Even if you don’t have access to a garden space, or if the bunnies have gone after your plantings, many of us have more beautiful fresh produce at hand than other years. Maybe you are getting the kids out of the house and putting them to work in the fields of a pick-your-own berry farm or you are simply taking advantage of the plentiful baskets at your local farmers market.
If your cup runneth over with delicious fruit, consider home canning and preserving. Get in touch with your inner homesteader and make great tasting memories of summer! Almost all summer fruits can be canned or preserved and one of the most flexible and delicious ways is making jam.

Sweet-tart rhubarb is a cult favourite flavour, and the few weeks in early summer when it is in season can be the best tasting for sure. I went on a bit of a road trip and bought an armful of rhubarb from a farmer’s market and got ready to make pies, cobblers, and of course jam. This basic jam recipe can work for any low-pectin summer fruit or berry. Do check the resources linked below for more detailed pectin ratios and recipes.
Jam Maker’s Beginners Guide: Essential Equipment
Canning Jars
- Specifically made to withstand the pressure and temperature fluctuations of the canning process be careful you aren’t buying decorative mason style jars that are intended for crafts or drinking from at a barn wedding.
Utensils
- Non-Metal is best so there is no transfer of a metallic or tinny flavour
- You need; a wide mouth funnel, ladle, big wooden spoon for stirring, tongs for grabbing hot things (I like ones with rubber ends to help grab the jars)
- Helpful but not essential is a Canning Jar Lifter, basically a special set of tongs that grabs onto jars and lifts them easily.
- I was able to purchase a basic tool set with a funnel, Jar Lifter, and a headspace gauge. Many similar sets are available online.
Liquid Pectin
- While some fruits have an abundance of natural pectin (apples, pears, oranges ect) and don’t need any added to help them gel most berries and other fruits like rhubarb do.
- This recipe calls for Liquid Pectin but there is no practical difference between it and powdered however measurements may vary. Check the website of your pectin brand to be sure.
- The University of Minnesota has a great guide to pectin and a pectin calculator you can use for free!
- Be wary of recipes from the UK which ask for ‘Jam Sugar’ a form of granulated sugar with pectin already mixed in which is tricky to source in North America.
Canner
- A canner is a large pot similar to a roasting pan which allows filled cans to be submerged in boiling water for the canning process. This is a great tool that truly speeds up the process and allows you to process more jars of preserves at a time in a safe manner. If you plan on making jam or preserves often it is a great value.
- If you are trying this out and don’t want a huge new pot in your kitchen, I found if you work in batches, a few large saucepans can substitute.
Early Summer Rhubarb Jam
I used this basic recipe from Bernardin for my jam and doubled it to suit the amount of rhubarb I had on hand. It yielded 11, 1 cup/250mL jars.
Ingredients:
- 4 cups (1000mL) Diced Rhubarb (firmly packed)
- 5 cups Granulated White Suga
- ½ tsp butter/margarine (optional)
- 1 pouch (85mL) Liquid Pectin
Method:
- Thoroughly wash your mason jars with dish soap and place on a rimmed cookie sheet to dry and stay hot in a low oven.
- Set screw bands and sealing lids/pop lids in a pot of water and bring to a simmer, then keep both in the hot water on the back of the stove.
- Thoroughly wash rhubarb and remove ends. Pulse in a food processor or finely dice, do not purée. Measure 4 cups (1000 mL) firmly packed.
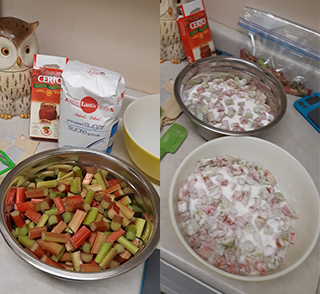
- Layer rhubarb and sugar in a large bowl (plastic or glass) and let sit for at least an hour. This draws out some moisture and allows the pieces to hold their shape better.
- Combine prepared rhubarb and sugar in a large, deep stainless-steel saucepan. Add 1/2 tsp (2 ml) butter or margarine (to reduce foaming). Over high heat, bring mixture to a full rolling boil that cannot be stirred down.
- Add liquid pectin, squeezing entire contents from pouch. Return to boil; boil hard 1 minute, stirring constantly. Remove from heat and skim off foam.

- Remove hot jars from oven and put on a heat-proof surface on the counter. Have a large plate between this set-up and the jam pot to use for filling.
- Working quickly (but safely) ladle hot jam into a hot jar to within 1/4 inch (0.5 cm) of top rim/headspace. Using non-metallic utensil, remove air bubbles and adjust headspace, if required, by adding more rhubarb mixture. (See note above about tools)
- Wipe jar rim removing any jam residue. I keep damp paper towel squares on hand to quickly wipe them down.
- Centre hot sealing disc/pop lid on clean jar rim. Screw band down until resistance is met, then increase to fingertip tight. Return filled jar to rack in canner or pot. Repeat for remaining jam.
- When canner is filled, ensure that all jars are covered by at least one inch (2.5 cm) of water. Cover canner and bring water to full rolling boil before starting to count processing time. Boil filled jars for 10 minutes.
- When the processing time is complete, remove canner lid, wait 5 minutes, then remove jars without tilting and place them upright on a protected work surface. Cool upright, undisturbed 24 hours; DO NOT RETIGHTEN screw bands.
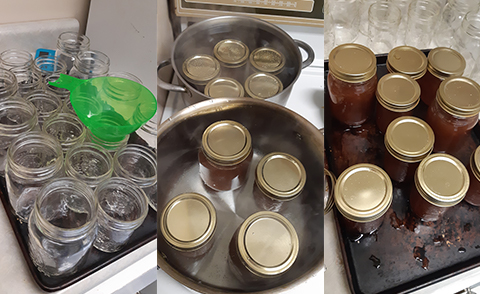
- Over the next few hours, you should hear a choir of light popping as the jars seal. It’s thrilling to hear.
- After cooling check jar seals. Sealed discs curve downward and do not move when pressed. Remove screw bands; wipe and dry bands and jars. Label and store jars in a cool, dark place. For best quality, use home canned foods within one year.
- If any of the jars do not seal, store them in the fridge and consume within a month.
Home preserves take a bit of planning and set-up, but the process really takes less than an hour. The impact is huge though, slip a jar of homemade jam into a holiday hamper or housewarming gift and you’re sure to impress. Plus, it’s just plain tasty!